
To view a material, it must first be rendered in either the viewport or by a dedicated renderer. It is important to note the difference between these two methods. A viewport material is rendered on a computer’s graphics processing unit (GPU) and is rendered in real time. To achieve this speed, we must sacrifice some realism, and we cannot use advanced effects that come from bounced lighting. When rendering using a dedicated renderer, our calculations can take much longer, and we can produce realistic effects by bouncing rays of light throughout the scene.
When rendering in real time, the GPU uses a shading algorithm or shader to define how the material interacts with light. Clara.io makes use of two shader types, listed under the Material Type option. Below is an interactive scene embedding. Click and drag to orbit the camera and see the Material’s reaction to the scene lighting.
Lambert: A lambert material has no highlights, and cannot benefit from bump mapping.
Phong: A phong material is more computationally expensive, but can display highlights and bump mapping.
Material properties, such as color, texture, transparency and reflectivity, describe how a material looks. Below is a description of these properties and their associated maps.
Ambient reflection determines what color an object takes under ambient lighting. Each scene in Clara.io is lit by a global or ambient light. This light is applied to all objects evenly from all directions. It can be found under the the scene’s Environment > Ambient Light property. However, ambients lights only affect objects with appropriate ambient color or map settings.
Note: When lighting is applied to a material, the light color is multiplied with the material color. This means that a pure red light (255, 0, 0) shining on a pure green material (0, 255, 0) results in black due to multiplication by zero.
The ambient map takes a colored texture that is displayed under ambient light. If present, this map overrides the Ambient color.
Note: This map is not currently visible in the viewport.
Diffuse reflection determines what color an object takes under direct lighting. This color is strongest in the direction of the light and fades off as the angle to the surface increases.
The diffuse map takes a colored texture that is displayed under diffuse and ambient light. If present, this map overrides the Diffuse color.
Specular reflection determines the color of an object’s highlight. Highlights appear as a reflection of the light on the surface of the object.
The specular map is a mask for the specular highlight. This can be used to determine which areas of the object receive highlights.
Glossiness determines the size and sharpness of the highlight. Low values produce wide and blurred highlights, while higher values produce small and sharp highlights.
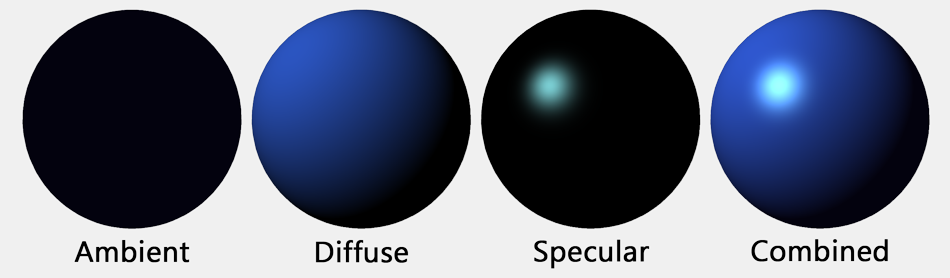
Above: The combination of ambient, diffuse, and specular as it appears in the Clara.io viewport.
Above: An interactive Clara.io viewport displaying an ambient, diffuse, and specular as they appear individually and combined.
Opacity determines the material’s transparency. A material with an opacity of 1 is fully opaque, while a material with an opacity of 0 is fully transparent. Values between these two create translucent materials.
The opacity map is a mask that determines which areas of the object are visible, where white is fully visible and black is transparent.
Note: This map is not currently visible in the viewport. However, the effect can be achieved in the viewport by using the alpha channel of the diffuse map.
Emissive light determines a materials ability to emit its own light or glow. Note that this does not cause the material to emit light on to other materials, nor does it cause a glow effect. In this case, emission refers to areas of the material that are are unaffected by the presence any external lights.
The emissive map is a mask that determines which areas of the object receive the Emissive color.
Note: This map is not currently visible in the viewport.
Bump maps and normal maps serve as ways to add texture our objects. They create the illusion of differences in height by adjusting how light affects the object.
Bump maps are a grayscale image that define low areas (black) and high areas (white) of a mesh.
Normal maps are more complex. Each pixel represents an RGB-encoded normal to the surface. This allows for more information to be stored, and can create high detail surface textures. Normal textures are typically generated from an external program.
Note: If both normal and bump maps are assigned, only the normal map will be visible in the viewport.
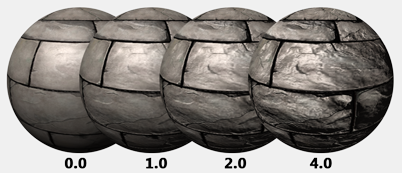
Above: Normal map textures at different Normal Factor values as they appear in the Clara.io viewport. Notice how the silhouette of the sphere never changes.
Above: An interactive player of Normal map textures at different Normal Factor values as they appear in the Clara.io viewport. Notice how the silhouette of the sphere never changes. Further more, you can interact with the embedded scene below to see how the Bumps and Normals react differently to the scene lighting.
Reflection determines how much of the environment is reflected. A material with a reflection of 1 is a mirror, while a material with a reflection of 0 reflects nothing.
Refraction determines how light is distorted as it enters a transparent or translucent object. The Refraction Index is based off of real world calculations of how light is bent as it enters a medium. More information can be found here.
Note: This value is not visible in the viewport.
A cube map is a map composed of six textures. In this case, we use the cube map to fake a reflection by providing it images of an environment. This ‘cube’ of images is then cast onto the surface of the object, simulating a surrounding environment for the object to reflect. The Blend CubeMap dropdown determines which operation the cube map uses to blend with the rest of the material.
Note: If both a normal and cube map is assigned, only the cube map will be visible in the viewport.
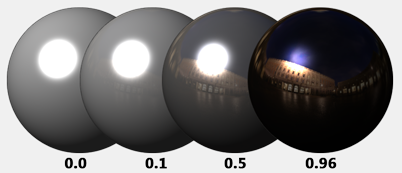
Above: Cubemap reflections at different Reflection values as they appear in the Clara.io viewport.
Above: An interactive viewport of Cubemap reflections at different Reflection values.